Linux Basics for the Aspiring Hacker, Part 15 (Creating a Secure Tunnel to MySQL)
Welcome back, my budding hackers!
In my continuing effort to build your basic Linux skills for hacking, I want to show you how to build a secure "tunnel" to MySQL.
Of course, the techniques I use here could be used for any application, but since MySQL is such a critical app on most Linux installations, and since un-encrypted sessions to your MySQL database server could easily be sniffed and confidential information exposed, we'll use our database server as our example in this tutorial.
This is not to say that an encrypted tunnel is foolproof from being hacked. As with anything, it can be hacked, but it makes it many times more difficult. If we leave the data un-encrypted, any script kiddie with a sniffer can see and grab our traffic to our database.
We'll be using SSH or Secure Shell to encrypt our traffic. Every Linux distribution has a SSH server and client built in, unlike Windows where you will need to download one of many SSH clients such as PuTTY. Our BackTrack has BSD OpenSSH built-in, so don't need to download and install anything to build a secure connection between our client and server.
Like so many other applications in Linux, SSH operates on a server/client architecture. To successfully connect, you must have both the server and the client running.
Step 1Open BackTrack & Start MySQL
MySQL has the capability of using SSH, but you must configure and compile it to do so. Since the default configuration of MySQL, such as ours on BackTrack, does not have SSH built-in, we need to do a workaround using the SSH built into the operating system and then connecting to MySQL. This will create an encrypted "tunnel" to our database, so that hackers can't view our transmissions back and forth to the database.
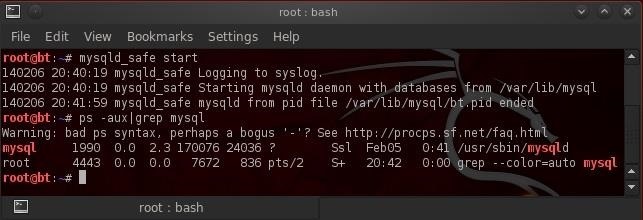
In our example here, we'll be connecting between two BackTrack installations. I have shown you how to start MySQL from the GUI in the previous Linux basics guide, but in many distributions of Linux you won't have that luxury, so let's start MySQL from the command line.
bt > mysql_safe start

Now, let's make certain that it started by checking our processes and "grepping" for mysql.
bt > ps aux | grep mysql
Step 2Generate Keys
In order for SSH to create its encrypted tunnel, it must first generate a key pair, a private key and a public key. These two keys will be used to encrypt and then decrypt the traffic over the tunnel. We can do this by typing:
bt >sshd-generate

As we can see, SSH has generated a key pair from which it will now be able to generate our secure tunnel. I have created a user named "nullbyte" on this server that we will use to connect to this machine.
Step 3Start SSH
From the client machine, we can now connect to that SSH server by typing:
ssh -L3316:127.0.0.1:3306 nullbyte@192.168.1.112

Here's a breakdown of what's in the command above.
ssh is the client command
-L3316 listens on port 3316
127.0.0.1 is the location of the SSH client daemon on the client machine
3306 is the default port of MySQL that we want the tunnel to on the server machine
nullbyte is a user on the operating system on the server
192.168.1.112 the IP address of the MySQL server
When we execute this command, we get a connection to the remote machine on nullbyte's account as shown below.

What we have done here is to connect to the SSH client daemon on our client system that then connects via port 3331 to the SSH server that then connects to port 3306 to connect to MySQL.

Step 4Connect to MySQL Securely
Now that we are securely connected to the server that contains the MySQL database, we can now login to the database over this tunnel. I have a MySQL user named "test4" (not the OS user—we connected via an OS user and we connect to MySQL via a MySQL user) on that database. Let's now login to that user's account.
mysql -u test4 -p

As you can see above, we have successfully connected to MySQL over this tunnel! All of the traffic between us and the remote database server is encrypted.
To make certain that we connected to the remote server and not our local database, I created a database on the remote server named "nullbyte".
Let's issue the "show databases;" command from the MySQL prompt.

As you can see, we have connected to the remote database server as it has the "nullbyte" database.
I'm hoping that you are finding these Linux fundamentals tutorials useful as they help to build your knowledge base that is useful for all of your hacking activities. For instance, in the near future, I'll show you how to hack this encrypted tunnel, so keep coming back, my tenderfoot hackers!
In my continuing effort to build your basic Linux skills for hacking, I want to show you how to build a secure "tunnel" to MySQL.
Of course, the techniques I use here could be used for any application, but since MySQL is such a critical app on most Linux installations, and since un-encrypted sessions to your MySQL database server could easily be sniffed and confidential information exposed, we'll use our database server as our example in this tutorial.
This is not to say that an encrypted tunnel is foolproof from being hacked. As with anything, it can be hacked, but it makes it many times more difficult. If we leave the data un-encrypted, any script kiddie with a sniffer can see and grab our traffic to our database.
We'll be using SSH or Secure Shell to encrypt our traffic. Every Linux distribution has a SSH server and client built in, unlike Windows where you will need to download one of many SSH clients such as PuTTY. Our BackTrack has BSD OpenSSH built-in, so don't need to download and install anything to build a secure connection between our client and server.
Like so many other applications in Linux, SSH operates on a server/client architecture. To successfully connect, you must have both the server and the client running.
Step 1Open BackTrack & Start MySQL
MySQL has the capability of using SSH, but you must configure and compile it to do so. Since the default configuration of MySQL, such as ours on BackTrack, does not have SSH built-in, we need to do a workaround using the SSH built into the operating system and then connecting to MySQL. This will create an encrypted "tunnel" to our database, so that hackers can't view our transmissions back and forth to the database.
In our example here, we'll be connecting between two BackTrack installations. I have shown you how to start MySQL from the GUI in the previous Linux basics guide, but in many distributions of Linux you won't have that luxury, so let's start MySQL from the command line.
bt > mysql_safe start

Now, let's make certain that it started by checking our processes and "grepping" for mysql.
bt > ps aux | grep mysql
Step 2Generate Keys
In order for SSH to create its encrypted tunnel, it must first generate a key pair, a private key and a public key. These two keys will be used to encrypt and then decrypt the traffic over the tunnel. We can do this by typing:
bt >sshd-generate

As we can see, SSH has generated a key pair from which it will now be able to generate our secure tunnel. I have created a user named "nullbyte" on this server that we will use to connect to this machine.
Step 3Start SSH
From the client machine, we can now connect to that SSH server by typing:
ssh -L3316:127.0.0.1:3306 nullbyte@192.168.1.112

Here's a breakdown of what's in the command above.
ssh is the client command
-L3316 listens on port 3316
127.0.0.1 is the location of the SSH client daemon on the client machine
3306 is the default port of MySQL that we want the tunnel to on the server machine
nullbyte is a user on the operating system on the server
192.168.1.112 the IP address of the MySQL server
When we execute this command, we get a connection to the remote machine on nullbyte's account as shown below.

What we have done here is to connect to the SSH client daemon on our client system that then connects via port 3331 to the SSH server that then connects to port 3306 to connect to MySQL.

Step 4Connect to MySQL Securely
Now that we are securely connected to the server that contains the MySQL database, we can now login to the database over this tunnel. I have a MySQL user named "test4" (not the OS user—we connected via an OS user and we connect to MySQL via a MySQL user) on that database. Let's now login to that user's account.
mysql -u test4 -p

As you can see above, we have successfully connected to MySQL over this tunnel! All of the traffic between us and the remote database server is encrypted.
To make certain that we connected to the remote server and not our local database, I created a database on the remote server named "nullbyte".
Let's issue the "show databases;" command from the MySQL prompt.

As you can see, we have connected to the remote database server as it has the "nullbyte" database.
I'm hoping that you are finding these Linux fundamentals tutorials useful as they help to build your knowledge base that is useful for all of your hacking activities. For instance, in the near future, I'll show you how to hack this encrypted tunnel, so keep coming back, my tenderfoot hackers!


No comments